Search for: Recent Posts Simple trick to install Windows 11 on an old PC Easy ways to activate Windows 11 for FREE without a product key Remove “You may be a victim of software counterfeiting” notification Windows Defender detects my scripts as “HackTool:BAT/AutoKMS” Quickly convert Windows Server Evaluation edition to the retail one Easiest way to remove the Windows watermark from your screen Categories Computer Tips Microsoft Software Products 2 ways to activate Windows 10 for FREE without additional software Posted by Always Smile in Microsoft Software Products / Last updated on August 26, 2021 As you know, Microsoft notified Windows 10 is “the last version of Windows” and explained that they will be focused on the development of powerful and new features under the guise of software updates instead of building a new version. This means there will be no Windows 11 or 12 in the future(*). So if you are thinking about an upgrade, this is the b...
Get link
Facebook
X
Pinterest
Email
Other Apps
Also i have entered this in the coding contest. So please vote for me!!
So in the words of all the other instrucablers that have posted, Lets Get Started!!
Step 1: New VB Project in Visual Studio
First I am going to assume that if you know what Visual Studio is then you have some programming knowledge. Even if it is not in VB, I will try to make the steps as easy as possible to follow along.
Start a New VB Project
We will only be using one form. Once the form is showing in the design area we need to add the 'Shockwave Flash Object' by right clicking the toolbox, anywhere doesn't matter, and click 'choose item'
Step 2: Selecting the Shockwave Flash Object
2) A new window will open with several tabs across the top. Click the tab that says 'COM Components'. Scroll down through the list of names until you see 'Shockwave Flash Object', then click the check box next to it. Then click the OK button. The window will close and you should now have a new item in your tool box called Shockwave Flash Object.
Step 3: Work on the Form Design
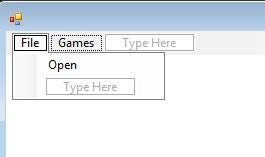
From the 'Menus & Toolbars' section of the toolbox drag a menu strip onto the form and drop it. It should be called MenuStrip1. On the menu strip on the form there will be a box that says 'Type Here'. In the first box enter the word File. Click the box below it and type the word Open.
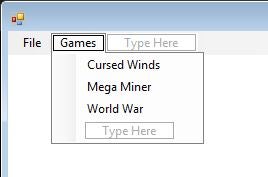
Now next to the word file enter the word Games. now this where it gets a little tricky. If you do not have any games yet downloaded and saved then you can leave the menu slots below Game empty until you do. Otherwise type the name of the games in below Games. One name per line.
Step 4: Add the New Shockwave Control to the Form
Locate the new Shockwave Flash Object in your toolbox and drag and drop it on the form anywhere. Once it has been added make sure it is selected and change the 'Dock' property to 'Fill'. This makes the control resize with your window as it changes size.
Step 5: Add the Code for the Open File Menu
Now in case you don't have any games yet, or for some weird reason you don't want to add any, you can open any Shockwave Flash Object and it will play in this window. Double click the word Open below File and you will be taken to the code entry window. You will need to enter the following code:
Private Sub OpenToolStripMenuItem_Click(sender As Object, e As EventArgs) Handles OpenToolStripMenuItem.Click Dim ofd As OpenFileDialog = New OpenFileDialog If ofd.ShowDialog = Windows.Forms.DialogResult.OK Then Dim swfFile As String = ofd.FileName AxShockwaveFlash1.LoadMovie(0, swfFile) AxShockwaveFlash1.Play() End If End Sub
Now if you have no games you are done. you can compile and run the code. Remember you will need some .swf file to load for it to play. If you a a game or two that you would like to install into the program continue on to the next step(s).
To make sure that your program can find the game(s) you will need to create a directory inside your VS solution directory. You can really put the sames anywhere as long as you know the directory but its easier if they are in the same directory.
As you remember I have three games in my program. To code them into the program you simply double click the name of the game under the Game menu. Again you will be shown the code entry screen where you will need to enter the code below:
Private Sub CursedWindsToolStripMenuItem_Click(sender As Object, e As EventArgs) Handles CursedWindsToolStripMenuItem.Click Dim swfFile As String = Application.StartupPath & "\FlashGames\" & "cursedwinds.swf" AxShockwaveFlash1.LoadMovie(0, swfFile) AxShockwaveFlash1.Play() End Sub
Please note the code after the & signs in the Dim line will be different. Where mine says "\FlashGames\" you would put in the directory where your games are located. Also after the second & sign, where my code says "cursedwinds.swf", you would enter the name of your file or game.
If you have more files you would like in the menu, then simply double click the name under the games menu and then copy the code from the first game you entered. The only change you would need to make is the name of the file, assuming that it is the same directory as the first.
If I make any upgrades to the code I will add it to the instructable. Also please remember if you like this ible them please vote for me in the coding contest.
Thank you.
Step 8: Update: 5-13-2015
Here is the code to open a file from the menu:
Dim ofd As OpenFileDialog = New OpenFileDialog If ofd.ShowDialog = Windows.Forms.DialogResult.OK Then Dim swfFile As String = ofd.FileName AxShockwaveFlash1.LoadMovie(0, swfFile) AxShockwaveFlash1.Play() End If


Comments
Post a Comment